Toni Elias ( 6° 1´ 39" 711): "E´ stato un turno decisamente difficile per il traffico che c´era in pista e forse con pista libera potevamo fare meglio comunque in definitiva bisogna accontentarsi di questo sesto posto. La seconda fila è comunque positiva ed in ogni caso è decisamente meglio di quanto fatto a Silverstone. Adesso sarà molto importante cercare di partire bene domani senza avere molti problemi. Abbiamo lavorato bene anche se non abbiamo il ritmo di Iannone ma domani al contrario di quello che è successo al Mugello cercheremo di restare con lui senza lasciarlo andare via. "
SESTO TEMPO E SECONDA FILA PER ELIAS AD ASSEN
Il pilota del Team Gresini Toni Elias scatterà domani dalla seconda fila dello schieramento di partenza. Una posizione che non soddisfa in pieno il pilota di Manresa ma chè decisamente meglio del risultato conseguito nelle recenti qualifiche
di Silverstone. Il passo di gara è buono e con una partenza azzeccata potrà inserisrsi sicuramente tra i protagonisti del TT olandese. Brutta caduta nelle prove della mattina per il russo Ivanov che si è procurato una lieve distorsione del ginocchio ma che è comunque sceso in pista per le prove di oggi pomeriggio.
Toni Elias ( 6° 1´ 39" 711): "E´ stato un turno decisamente difficile per il traffico che c´era in pista e forse con pista libera potevamo fare meglio comunque in definitiva bisogna accontentarsi di questo sesto posto. La seconda fila è comunque positiva ed in ogni caso è decisamente meglio di quanto fatto a Silverstone. Adesso sarà molto importante cercare di partire bene domani senza avere molti problemi. Abbiamo lavorato bene anche se non abbiamo il ritmo di Iannone ma domani al contrario di quello che è successo al Mugello cercheremo di restare con lui senza lasciarlo andare via. "
ENGINE SPECIFICATION YAMAHA YZF R6 2010
![yamaha yzf r6 yamaha yzf r6](http://bp1.blogger.com/_Mvhjidbvdzc/RuYOiWo4sEI/AAAAAAAABzE/OTwqR7p8VRI/s0-d/2008%2Br6%2B4.jpg)
this is engine specification of yamaha yzf r6 2010:
Yamaha YZF-R6 is a motorcycle that powere with engine 599cc liquid-cooled inline 4-cylinder; DOHC and 16 titanium valves.
The other specifications of 2010 Yamaha YZF-R6 are as the following:
-Final Drive: Chain
-Bore x Stroke 67.0 x 42.5mm
-Compression Ratio 13.1:1
-Fuel Delivery Fuel Injection with YCC-T and YCC-I
-Ignition : TCI: Transistor Controlled Ignition
-Transmission 6-speed w/multiplate slipper clutch
price list yamaha yzf r6:
The price of Yamaha YZF-R6 MSRP are as the following:
$10,490 (Raven) Available from February 2010
$10,490 (Team Yamaha Blue/White) Available from February 2010
$10,490 (Pearl White) Available from February 2010
( 2010 ) NEW TRIUMPH DAYTONA 675 SE
The New Triumph Daytona 675SE beauteous new liverylivery has been advised to enhance the British bike’s glassy and attenuate profile, with anew styled dejected cartoon and race-inspired pinstripes on the graphite coloured wheels.
Powered by the critically-acclaimed 675cc three-cylinder agent bearing 126bhp, the Daytona 675SE is mechanically identical to the accepted Daytona 675, which has accustomed accepted acclaim back its addition at the alpha of the year. Back barrage the accepted archetypal has won abundant alley and clue based accumulation tests adjoin its supersportsupersport chic competitors and is the apparatus of best for the acute rider.
![( 2010 ) NEW TRIUMPH DAYTONA 675 SE ( 2010 ) NEW TRIUMPH DAYTONA 675 SE](https://blogger.googleusercontent.com/img/b/R29vZ2xl/AVvXsEhuSLjrpeP-MgCbTzBUgGcD3fHqk2mTDJP3QQCkawjNgBHYIErIXYMz1WDiZZ7ItpcTI1qkwYY9uTRgOr3kNy0_jubrmdKRa00ChaQNpVXSOE5K1kZI_RNA9UfG0Un_LkYEHLT7EOmwEEy1/s800/(+2010+%29+NEW+TRIUMPH+DAYTONA+675+SE+1.jpg)
The circuit-developed apparatus embraces the actual latest anatomy technology, including awful adult and adjustable abeyance both at the advanced and rear. These abeyance units, adjustable for both aerial and low acceleration compression damping, accord unparalleled levels of ascendancy for the antic addition while alms a plusher than accepted ride on asperous alley surfacesroad surfaces.
A abounding ambit of official accessories are accessible for the Daytona 675SE, giving owners an befalling to personalise both the looks and achievement of their machine. Clue day enthusiasts are able-bodied catered for with a cardinal of accessories, including abundant failing carbon fibre parts, a ‘plug-and-play’ quickshifter set, and admirable race-style rear set footrests and silencers developed in cooperation with Italian chase specialists Arrow Special Parts.
Powered by the critically-acclaimed 675cc three-cylinder agent bearing 126bhp, the Daytona 675SE is mechanically identical to the accepted Daytona 675, which has accustomed accepted acclaim back its addition at the alpha of the year. Back barrage the accepted archetypal has won abundant alley and clue based accumulation tests adjoin its supersportsupersport chic competitors and is the apparatus of best for the acute rider.
![( 2010 ) NEW TRIUMPH DAYTONA 675 SE ( 2010 ) NEW TRIUMPH DAYTONA 675 SE](https://blogger.googleusercontent.com/img/b/R29vZ2xl/AVvXsEhuSLjrpeP-MgCbTzBUgGcD3fHqk2mTDJP3QQCkawjNgBHYIErIXYMz1WDiZZ7ItpcTI1qkwYY9uTRgOr3kNy0_jubrmdKRa00ChaQNpVXSOE5K1kZI_RNA9UfG0Un_LkYEHLT7EOmwEEy1/s800/(+2010+%29+NEW+TRIUMPH+DAYTONA+675+SE+1.jpg)
NEW TRIUMPH DAYTONA 675 SE WALLPAPER
The circuit-developed apparatus embraces the actual latest anatomy technology, including awful adult and adjustable abeyance both at the advanced and rear. These abeyance units, adjustable for both aerial and low acceleration compression damping, accord unparalleled levels of ascendancy for the antic addition while alms a plusher than accepted ride on asperous alley surfacesroad surfaces.
A abounding ambit of official accessories are accessible for the Daytona 675SE, giving owners an befalling to personalise both the looks and achievement of their machine. Clue day enthusiasts are able-bodied catered for with a cardinal of accessories, including abundant failing carbon fibre parts, a ‘plug-and-play’ quickshifter set, and admirable race-style rear set footrests and silencers developed in cooperation with Italian chase specialists Arrow Special Parts.
( 2010 ) NEW CAN-AM SPYDER ROADSTER RS-S
The Spyder faces no absolute antagonism to date, i.e. a axial basement apparatus with two-wheels in advanced and one in back. Harley Davidson’s Street Glide Trike and Tri Glide Ultra Classic accept their distinct caster up front, afterpiece to a motorcycle, and advertise for a lot more: $19,299 for the Spyder RS compared to $33,109 for the H-D Trike and $36,689 for the Tri Glide. The aforementioned can be said for the assorted three caster about-face kits for assorted H-D and ample Honda bikes. Piaggio’s MP3 scooters behave absolutely like a motorcycle. And, the T-Rex from Campagna Motors appear with a roof and abounding cage, houses the disciplinarian and commuter side-by-side central the borderline anatomy instead of over the engine, appearance a council wheel, and sells for over $53,000 a pop.
![( 2010 ) NEW CAN-AM SPYDER ROADSTER RS-S ( 2010 ) NEW CAN-AM SPYDER ROADSTER RS-S](https://blogger.googleusercontent.com/img/b/R29vZ2xl/AVvXsEgiBnhcxRuVn0uJTn7K8ZkvILtWC2JdKvcE0IdYcOJ6qcglTkxxK24p_b6cDm_7I57F5U6N8eBDoLvlV7FRfj_Uu0u19fhh5GmDStqYveNzTkbyTnqEDvjMDtNznJ2T-7be7Beuc6grLPQX/s800/NEW+CAN-AM+SPYDER+ROADSTER+RS-S.jpg)
![( 2010 ) NEW CAN-AM SPYDER ROADSTER RS-S ( 2010 ) NEW CAN-AM SPYDER ROADSTER RS-S](https://blogger.googleusercontent.com/img/b/R29vZ2xl/AVvXsEh-PzKHnYPCYKRDoctnVCtqj2HmFWXAGxUsjOF4dNIXpdbr8vOnL3_2YnRSAk0_HAkLFYbfrt8hbM2tAae6YqnHjZnlRbltvFVsOBo31SqIjQOwDZRu3Abhyl6TpdG-5VXlXOKNgeq8sZB2/s800/NEW+CAN-AM+SPYDER+ROADSTER+RS-S+1.JPG)
The Spyder’s action touring orientation, embodied by the quick and liveable RS (More Porsche than Mercedes) model, agency it is advised added for an auto audience rather than a motorcycle one. In fact, all you charge to ride a Spyder in Quebec is a Class 5 active admittance (automobile) and booty a 7-hour specialized training session, article that is abiding to allurement abounding newcomers to the open-top experience. A motorcycle admittance additionally allows you to ride it, of course.
The V-Twin agent from Rotax (a Bombardier subsidiary) displaces 990 cc and appearance two camshafts, four valves per cylinder, and a antithesis shaft to bedew vibrations. Earlier versions of this abundant agent powered the Aprilia RSV1000R and Tuono 1000R, again the Buell 1125R and CR, area it accepted reliable and angry out added than absorbing performances. On the Spyder RS-S, the best contempo iteration, as acclimatized to the roadster’s accurate needs, delivers 106 ponies at 8,500 rpm, a accomplished 33 hp beneath than the adaptation powering the Aprilias. The accommodation is added torque over a nice, constant, ample ambit that bliss off as aboriginal as 2,000 rpm and climbs up to 77.8 ft-lb at 6,250 rpm, area it gradually tapers off en avenue to the red line.
![( 2010 ) NEW CAN-AM SPYDER ROADSTER RS-S ( 2010 ) NEW CAN-AM SPYDER ROADSTER RS-S](https://blogger.googleusercontent.com/img/b/R29vZ2xl/AVvXsEgiBnhcxRuVn0uJTn7K8ZkvILtWC2JdKvcE0IdYcOJ6qcglTkxxK24p_b6cDm_7I57F5U6N8eBDoLvlV7FRfj_Uu0u19fhh5GmDStqYveNzTkbyTnqEDvjMDtNznJ2T-7be7Beuc6grLPQX/s800/NEW+CAN-AM+SPYDER+ROADSTER+RS-S.jpg)
( 2010 ) NEW CAN-AM SPYDER ROADSTER RS-S WALLPAPERS
The Spyder’s action touring orientation, embodied by the quick and liveable RS (More Porsche than Mercedes) model, agency it is advised added for an auto audience rather than a motorcycle one. In fact, all you charge to ride a Spyder in Quebec is a Class 5 active admittance (automobile) and booty a 7-hour specialized training session, article that is abiding to allurement abounding newcomers to the open-top experience. A motorcycle admittance additionally allows you to ride it, of course.
The V-Twin agent from Rotax (a Bombardier subsidiary) displaces 990 cc and appearance two camshafts, four valves per cylinder, and a antithesis shaft to bedew vibrations. Earlier versions of this abundant agent powered the Aprilia RSV1000R and Tuono 1000R, again the Buell 1125R and CR, area it accepted reliable and angry out added than absorbing performances. On the Spyder RS-S, the best contempo iteration, as acclimatized to the roadster’s accurate needs, delivers 106 ponies at 8,500 rpm, a accomplished 33 hp beneath than the adaptation powering the Aprilias. The accommodation is added torque over a nice, constant, ample ambit that bliss off as aboriginal as 2,000 rpm and climbs up to 77.8 ft-lb at 6,250 rpm, area it gradually tapers off en avenue to the red line.
Bajaj Pulsar Like Yamaha fz16 150cc Modified
Bajaj pulsar like yamaha fz16 150cc modified
This Pulsar 220 was originally red in colour. But the buyer went advanced and adapted it a bit. As you can see, it now has a custom acrylic job in white, graphics, abounding fairing, R6 archetypal cardinal bowl holder, a atramentous affair with the auto and agent painted, and the affectionate of gold disks you usually acquisition on superbikes. All this amount Rs. 25,000. We candidly feel the R15 would be better, but again back the buyer adapted this, there was no R15 around.
Honda Blade Concept Modification From CBR600
![](http://4.bp.blogspot.com/_nt1knDXPQbQ/Szk6h_YZRLI/AAAAAAAACL0/Y_caBnm3RKw/s800/Honda+Blade+Concept+Modification+From+CBR600.jpg)
Honda Blade Concept Modification From CBR600Closing the 2010, Adhi Wicaksono handed Danukusuma modification works as a sort of breakthrough. Selected base modifiers of Lent Automodified Probolinggo, East Java, this is a Honda Blade 2010. "This must be a phenomenal work, so I'm support gone," said Budiono, the owner of the motor dealer who...
TVS Apache RTR 160 FI - Fast Injection Motorcycles
TVS Apache RTR come with many features, today, i hear that TVS motorcycles has launched TVS Apache RTR 160 FI. You know that APACHE RTR Series is good for acceleration lover, do you ever seen about Apache 160 RTR video on youtube.com? i thing it's awesome for 160CC of Motorcycles.TVS Apache RTR 160 160 FI used 159,7CC of engine displacement, almost same with Yamaha FZ 16, but 10CC more than Yamaha YZF 150. Max power from TVS Apache RTR 160 FI : 15,7 bhp@8500 rpm and Max Torque : 13.1 Nm @ 6500 rpm, with special injection engine : EFI 4 stroke. Weight : 139kgs.
So.. will it more better than RTR 160 before? i thing yes.. with FI (injection)technology, it's more better.
MOTOGP GP
Con un ulteriore positivo passo avanti Marco Simoncelli centra la sua miglior qualifica in MotoGP con un positivo ottavo posto sullo schierameto di partenza di domani. Marco Melandri, invece, a causa di una banale caduta, nelle prove di questa mattina, si è procurato una lussazione della spalla sinistra che non gli ha permesso di scendere in pista nelle prove di oggi pomeriggio.
"Super Sic" ha ulteriormante dimostarto di essere in continuo e costante progresso riducendo il distacco dai primi e facendo anche segnare un ottimo passo gara che lascia ben sperare per domani. Melandri da parte sua con tutta probabilità non sarà al via pur rimanendo aperto un piccolissimo spiraglio di poterlo vedere in gara domani dopo un tentativo che forse effettuerà nel corso del warm up. Se il tentativo avrà esito negativo lo rivedremo in sella settimana prossima in Catalunya.
Marco Simoncelli (8° 1´ 35" 283): "Non male, sono molto contento perchè questa mattina pur essendo andato abbastanza bene avevo qualche dubbio oggi, invece, la moto è andata decisamente meglio. Abbiamo trovato le giuste soluzioni per poter avere un "feling" migliore e riuscivo a guidare con maggior scioltezza. Ho fatto dei bei tempi anche da solo e sono riuscito a tenere un buon ritmo. Insomma sono felice e credo che domani potrò riuscire a fare una buona gara. Se riesco a partire bene posso anche pensare di restare tra i primi cinque."
Modification Bajaj Pulsar Motor Italian Style
Bajaj Pulsar 180 DTS-I fabricated in 2010 came from India. He alone administer the appearance abounding dress archetypal alias battlefront MotoGP. "Pulsar this box will be added for the purpose of Turing," says the arch of the Riau Bajaj Community...
Custom Motor Modification
![](https://blogger.googleusercontent.com/img/b/R29vZ2xl/AVvXsEgj9tJmC65U9ZpWtXLWQ9tSA75POe44V6sXuSSSgptEJPtIQzWM9nzdk_dCjcR5clY5hmb52ShjzeiJSPNAL680nMjMRreBDOBGdou2FxM_YYlf4u_8HqaW3nm3aKvkMgx8gGZUsAfAa-Ci/s320/tb-1_SeKpA_7071.jpg)
American Chopper Modification 2010
![](https://blogger.googleusercontent.com/img/b/R29vZ2xl/AVvXsEi4qmIbc7oytyB80nhKthtpwbrMsfiBGagKiMEVKjsL7TozJYwyPB9Er5LaeI8gbVQyWuNBvLKNj47vmBRPoNue8uUeflUfqjervM2mZ5LuVzn5lTHEfkQdjR8lfZb6p_cQALi1zjSUc0Mi/s400/0826_bike2_l6Q8w_17340.jpg)
Barbican Turbo Show
![](https://blogger.googleusercontent.com/img/b/R29vZ2xl/AVvXsEhj8CnziTH_qiX8x66r3vOc_S4y1S7iNll-N3Bn30XQztTP7S3l-WRQGfAlv9RovVFDvL2hs1l0K6T3HlvBnsNpbT1Mh5f4YL43IBr_qtzC4k-8gtfC3jgA25Jb_n-8StvxgKTRvi9KVQkF/s320/chevCorvette-001.jpg)
The inaugural Barbican Turbo Show, organized by the United Business Media was the hottest and biggest custom car festival ever to hit the UAE. It featured some of the most awesome customized and performance modified cars in the Middle East, all gathered under one roof at the Abu Dhabi National Exhibition Centre in November 2008. Motor clubs displaying their members custom cars included UAE Boost, the VW Club, the Abu Dhabi Riders, SAFE (Society of Auto Owners and Filipino Expats), Pinoy, ExoClass and the Corvette UAE Club. The glittering custom cars on display ranged from well maintained classic cars to pimped-out Hummers and over-the-top street racers!
And as if that wasn't enough, the top Japanese car drifting team, Team Orange Drift, who showed off their in The Fast and the Furious: Tokyo Drift, brought along two orange-striped 450 bhp Subaru Impreza GBDs in which they performed twin-drifts (tsuiou)! Pity the Barbican Turbo Show was staged on the same weekend as the Motorsports Festival at the Dubai Autodrome.
Anyway, here's a collection of images from the event...
New Honda CB1000R (2010) Modifications - CPJBU2YTTR86
![](https://blogger.googleusercontent.com/img/b/R29vZ2xl/AVvXsEjVgTRHQFPbWUATMavfVUvzaO98XQMZRu9rrv2JsVN2CBH-Dg4mbLU5S94lzWUzzN0tynjCWJOD15N7G74DUg91rRQLFquKiuTnDGa8YRnz-9qChqMtezsEmCap62AjabvC91AtKHykxLIg/s800/2010+Honda+CB1000R.jpg)
NOS Basics and Layout
![](https://blogger.googleusercontent.com/img/b/R29vZ2xl/AVvXsEhCU3AExJmpKJ6P_m3aDi_tlGvPnHu8bZ9t7m6CPN5QNchRCJZSUKT_wv4BqZ9jVK0fvQDS1HzV837BpBhUf20RA6zD2VnoyYJEIDhcEQzYlL7crsfpRW3BJCaS0UzPyumkP2ZUy60sphUV/s320/nos-layout.gif)
High pressure nylon or Teflon inner-lined braided-steel pipe is used to carry the Nitrous Oxide to the engine where it is regulated by the NOS solenoid. The solenoid is an electrically controlled valve which uses a strong electromagnetic field to open a small plunger the blocks the flow of the liquid Nitrous Oxide. A second solenoid is used to supply extra fuel so that the air/fuel mixture remains constant. Both solenoids are controlled by electric switches that activate the electromagnetic field. The NOS system should have at least two switches — a microswitch that is fitted to the accelerator linkage and is only activated at full throttle; and a spring-loaded momentary switch that is activated by the driver. The microswitch on the accelerator linkage ensures that the nitrous system can only be activated at full throttle. Activating the system during part throttle or during a gear change can have very catastrophic consequences. As an added precaution, the oil pressure switch can also be used to ensure that the system can only be activated when the engine is running and there is oil pressure. Starting an engine with NOS in the combustion chamber can also be very catastrophic.
Some more high pressure nylon or Teflon inner-lined braided-steel pipe is used carry the nitrous and fuel (which are still separate at this stage) to the intake manifold where it is released into the engine via two small jets that are located in a special nitrous injector. The jets must be correctly calibrated to release the correct amount of fuel for a given amount of nitrous. In addition, the pressure on the fuel supply side must be adequate and at a constant level to ensure that the air/fuel mixture is correct at all times. This may require the fitting of an electric fuel pump and a fuel regulator.
The quantity of the nitrous flow depends on the size of the jet fitted. A jet is basically a screw with a whole through it. It's used as a restriction tool depending on the size of the link up orifice. Applying a bigger jet is the easiest way to squeeze a bit more power out of your current system. The fuel supply comes from a similar jetting system.
Installing a Nitrous Oxide System (NOS)
![Installing a Nitrous Oxide System (NOS)](https://blogger.googleusercontent.com/img/b/R29vZ2xl/AVvXsEi2J0EBW7BOaAHW0rdekd-DuLsCWyzAN4wM-hWCaDVM_fBMv7pwxNzvQBxqpx47K21YL7Dp-n0qCjebWYCUXss2H_FjV3KDQZfUA1_CvdiF0F2guaBWX1MTD3ZXo2Sw1lHOUPofWK8e94Sj/s320/1.jpg)
Begin by installing the NOS tank. The correct installation of the tank is important to getting the most out of your nitrous system. As we've mentioned in our basic nitrous system guide, the NOS tank has a siphon tube that extends from the release valve to the bottom of the tank. The siphon tube reaches the side of the tank on the opposite side of the label. Therefore the tank should be installed at a 15° angle, with the label facing up and the release valve facing the front of the vehicle. This will ensure that more of the liquid N2O is used before the siphon tube begins to pick up gaseous Nitrous Oxide, even under acceleration.
Another consideration is the pressure of the NOS tank. The pressure of the NOS tank will fluctuate as the ambient temperature fluctuates. This can cause problems with the correct calibration of your air/fuel mixture. To overcome this problem, you should ensure that the NOS tank is mounted away from heat sources (such as the exhaust system) and out of direct sunlight. You can also use a NOS blanket to insulate the tank.
You should install the injectors next. The placement of the injectors will depend on whether you're installing a system with a single injector, or a Direct Port System that requires one injector per cylinder. When you need just one injector, you should install the injector as close to the throttle body as possible. If you have a rubber inlet hose connected to your throttle body, you must drill a suitably sized hole to fit the injector, and bolt the injector down with a nut and washer on either side of the hose. If you have a cast aluminum manifold, you must drill a hole and tap a thread into the cast aluminum for the injector to screw into. If you are fitting a Direct Port System, make sure that everything that must be fitted to the intake manifold is in place and find enough space on the manifold to fit the injectors. The injectors must be fitted at the same distance from the cylinder head but try not to fit the injectors too close to the cylinder head. Also, wherever you fit the injectors, apply a little locktight to the thread to ensure that the injector does not work itself loose. If you are installing a Direct Port System, you would need to install a distribution block between the solenoids and the injectors. The purpose of the distribution block is to distribute the fuel and nitrous between the injectors. Although it is not crucial, try to install the distribution block so that the tubes are more or less horizontal. The injectors for a Wet System has two inlets — one for fuel and the other for nitrous. You must connect the right tube to each inlet as indicated on the injector.
The next step is to install the solenoids. These should be installed away from the exhaust manifold but as close to the nitrous injectors as possible. The solenoids must also be installed slightly higher than the injectors to ensure that the nitrous and fuel do not need to flow upward as this will reduce the effectiveness of the system. The solenoids are electrically operated; therefore you'll need to run a few electrical cables to the solenoids.
Once you have your hardware in place, you can install the nitrous and fuel supply lines. It is best to route the tubing that carries the nitrous to the engine bay along the stock fuel line as this would be routed securely, and away from heat sources. The tubing should be secured to the vehicle so that it cannot be damaged by abrasion or by moving suspension and drive train parts. You can use nylon tie-wraps to secure the tubing to the vehicle but ½ inch Tinnerman clamps work much better. The tie-wraps or clamps should be placed no further than 18 inches apart. Whenever you route the tube trough a metal body panel, be user to use suitably sized rubber grommets to prevent the body work from cutting through the tube.
If you are using nylon tubing, you can use a sharp utility knife to cut the tube to the correct length leaving about 2 inches of free play at either end for possible flexing. Never cut the tubing too short and never cut the tube using a scissors or wire snips as this will deform the tube and make fitting the olive and nut quite difficult. Once you have cut the tube to the correct length, slide the nut over the tube with the treaded part facing the end of the tube. Never tighten the nut too much as this will cause the olive to compress the tube and will restrict flow through the tube. Then slide the olive over the tube. Secure the nut to the outlet on the NOS tank while keeping the tube in place and repeat the process at the other end where you must secure the nut to the inlet on the nitrous solenoid. The tube from the solenoid to the injector will require the same treatment. You can install the tube from the fuel solenoid to the injector as well but don't secure the tubing to the fittings on injector just yet — you will need to perform a few tests first. Also beware, the injector for a Wet System has two inlets — one for fuel and the other for nitrous. You must connect the right tube to each inlet as indicated on the injector. Next, tap into your fuel line using a metal T or Y splitter and fit the tubing that will supply fuel to the fuel solenoid and connect it to the inlet on the fuel solenoid.
The final step is to install the electrical circuit that will power the solenoids. The NOS solenoid must lift the plunger against the pressure that can be upwards of 800 psi in the system. A fair amount of current (amps) is required to accomplish this task so make sure that the electrical cables can supply the required amperage to lift the plunger. The electrical circuit should supply both solenoids with power and should incorporate a fuse, a microswitch fitted to the accelerator linkage, an arming switch and a relay. Start by disconnecting the negative terminal from the battery. This will prevent you from causing short circuits while working on the electrical system. Run a live wire from the positive terminal of the battery to the fuse box under the dashboard and on to a relay. Another live wire can then be run from the relay to the relay to the solenoids. This wire must carry sufficient current to activate both solenoids. You can fit the arming switch on the live wire between the relay and the solenoids as this wire will run close to the dashboard area; however it is better to place the switches on the earth wire. The earth wire will run from the solenoids to a suitable metal point on the vehicle's body but it is best to run the earth wire to the negative terminal on the battery. You can fit the microswitch to the earth wire as the solenoids would be placed close to the accelerator linkage.
There you have it, you're done. All that's left now is to test the nitrous system and ensure that the pressure to your fuel solenoid adequate, and then tune the nitrous system for best performance.
Testing and Tuning Nitrous Injection Systems
![](https://blogger.googleusercontent.com/img/b/R29vZ2xl/AVvXsEjgynRlv51Cmkyh2Gvd2utN-giAbaRu3MB-GVkOcPseuBHRLD8lk2oZD3BLG0bF8D8Jbgb_pvM9fxaKWmkwUzjdn5981wvFiKUENSci3EvtvS3KUQfJjVPGbeRkq059tkV3gCLFnvSfp1h3/s320/DSC07127.jpg)
TESTING NOS SYSTEMS
Once you have your nitrous system installed, you must test the system to ensure adequate nitrous and fuel flow. This will ensure proper performance and reliability.
Start by ensuring that the fuel line is properly attached to the fuel solenoid and turn the fuel pump on. You can do this by turning the ignition key to the ACC position. Check for fuel leaks where you tapped into the stock fuel line and where the fuel line feeds into the fuel solenoid. Cure any fuel leaks, check again for fuel leaks and then disconnect the fuel line from the nitrous injector. Activate the system and check for fuel flow when the system is activated, and that the fuel stops flowing when you deactivate the system. If you don't get fuel flow, check that the fuel solenoid is operating properly — you should hear an audible click when the solenoid is activated; check that you have fuel flow at the fuel filter; and ensure that fuel line is not kinked, twisted or bent. If you do have fuel flow, turn the vehicle's ignition off and properly secure the fuel line to the nitrous injector.
Now open the release valve on the nitrous tank check for frost along the nitrous feed line. The frost will indicate a nitrous leak. If you find any leaks, close the release valve on the nitrous tank and cure the leaks. Open the release valve again and ensure that you've cured all nitrous leaks. Then disconnect the nitrous line from the nitrous injector. Activate the system and check for liquid nitrous flow when the system is activated, and that the nitrous stops flowing when you deactivate the system. If you don't get nitrous flow, check that the nitrous solenoid is operating properly; and ensure that nitrous line is not kinked, twisted or bent. If you do have nitrous flow, you can properly secure the nitrous line to the nitrous injector.
TUNING NOS SYSTEMS
Nitrous tuning is another simple procedure but you should first tune your engine without nitrous as you will be running without nitrous for most of the time. Tuning the nitrous system is quite straight forward — you start with the jet sizes recommended by the manufacturer of your nitrous system and gradually adjust the jet sizes until the air/fuel mixture added by the nitrous system is perfect.
So install the jet sizes recommended by the manufacturer of your nitrous system. This will be conservative and will err on the rich size (i.e., too much fuel), which is the safe side to err on. Run you engine for a while with the nitrous activated and then check each of your spark plugs to determine how the air/fuel mixture is burning. The correct air/fuel mixture will produce a brownish, grayish-tan color on the spark plugs. If the spark plugs have a sooty, black color, your air/fuel mixture is too rich and you should increase the nitrous jet to the next jet size. If the metal part of the spark plugs displays a bluish or rainbow coloration, go to a smaller nitrous jet size immediately. Repeat this test until your spark plugs display the correct color. Never jump up by more than one jet size on the nitrous side and never try to work your way down from a lean mixture — that's just looking for trouble and major engine damage. You can make more power by increasing the fuel jet size and then adjusting the nitrous jet size up until your spark plugs display the correct color again.
WARNING: Back off as soon as you get detonation and reduce the size of your nitrous jet!
You may also need to adjust your ignition timing as nitrous oxide makes the air/fuel mixture burn much faster than normal. Retard the ignition timing by 2° increments (i.e., less advance before TDC) until you feel a noticeable loss of power. Then advance the ignition timing by 2°.
Now that that's done, your nitrous system is installed, tested and tuned; all that's left is for you to enjoy responsibly — always enjoy power responsibly!
Toyota
![Toyota](https://blogger.googleusercontent.com/img/b/R29vZ2xl/AVvXsEhamI8k69s-iDfUytmN-0-OIH4VareDY3VBs7W5psKPmU3YcRPhTB17MXpwgFEl52rwra4adVXPhy1ERqIwfcm4oPOmrZjM_RHpeJFqxzyR8TtjmaTddQo05AnNMt86EFC2aTZ6LNnEkHMT/s320/toyotaAristo-001.jpg)
Like the other big Japanese car manufacturers, Toyota has been a popular candidate for car modification and show car projects. At any show car event you wouldn't just expect to see a modified Toyota Supa but also modified Toyota Carolla and Toyota Aristo cars. These days you can even expect to see a custom Toyota Prius Hybrid or two!
Below are some of the coolest Toyota show cars from around the world...
Car Styling
![](https://blogger.googleusercontent.com/img/b/R29vZ2xl/AVvXsEgtsvg5smgsL0-n4kpnpxAM9ZnNJBfBVJesJS0RzOOwZigbVTcViAvN22JMar7LURdu5y312A2ifU0Gnk7YODwfGuDy7QQz8oHSp0wDdqFVQ-q90P3efBCEYJFFAPMfZdfEP8nYISBA_rOM/s320/pimpedOutEclipse.jpg)
Welcome to the Custom-car.us guide to pimping out your car, pimped out cars and car styling in general. This section is for the more modern pimped out car fanatic and is not so much about car performance. In fact it has almost nothing to do with engine performance and engine tuning but it has a lot to do with car customizing to make your car look as hot as it goes. Pimping out your car has a lot to do with car modification, car customization and of course, pimped out cars, even if it has nothing to do with engine power! In this section we'll discuss ways in which you can personalize and customize your car to make it stand out from the crowd. However, despite our age, we're more into customizing cars to look good with style and class rather than what we consider the vulgarity of the "pimped out cars" on M-TV's "Pimp My Ride" series.
With this in mind, there are a number of simple things you can do to customize your car on the outside. These range from the simple fitting of aftermarket alloy wheels, tinting your car windows and applying stick on decals, that you can do yourself, to the more complicated fitting of front bumper kits, side skirts and rear wings. This will require a visit to the spray painter to match the color of your car. For the more adventurous, we also have the more complex fitting of scissor doors or lambo doors as some people call it, and designing of your own aero kit. This will again require a visit to the spray painter when it comes to fitting and matching your car's color; and while you're at it you might want to get a customized paint job.
But it does not stop there; you can also customize the inside by fitting sports seats or bucket seats, an aftermarket steering wheel and gear lever, as well as aftermarket instrument gages and aluminum pedals. Then of course is the ICE, a cool sound system with a pop-up DVD display or two!
However, there are two crucial things to keep in mind when customizing and pimping your car. Firstly, it's no good pimping your car in bits and pieces by slapping on piece here and another there because you will end up with a car that looks like a monstrosity. You need to have a vision of what you want to achieve with your car. You need a style or a theme that says something about yourself; it is called car styling after all. You could model your car on a muscle car theme for example or a JDM theme or even a motorsport racing team but be consistent with your theme all the way down to the detail on your dashboard, gear lever and other interior parts.
Secondly, where ever possible try to be original. Aftermarket wide body kits are great but are even better if modified with a little style to create a completely unique look. If you want to be even more original, you could fabricate your own body kit as long as it's done with style.In the following pages we'll discuss various aspects of car customization, from fitting aftermarket alloy wheels to the more complex design, creation and installation of aero body kits. We'll also be discussing car detailing and auto detailing to keep it looking at its best.
Perhaps one day we may even discuss the fitting of those silly undercarriage neon lights and those gross looking wheel "spinners" that detract from rather than enhances the beauty of your car, but it is not on the agenda for now and we make no promises. Let's get on with our car styling and car customizing by fitting lambo doors to our ride ...
Split hoods and split bonnets
![](https://blogger.googleusercontent.com/img/b/R29vZ2xl/AVvXsEj4ZerJrGVJETRUx_c7S5GYyyl7s55hRIeS28GYIHu1RxhN2FZEQsgsZ6PWCpLh6tDML-Se31S70bOg-DRBYrq4pP6LA6kDXrgdJdLbyO9wDKUuLhIg3l1Af8hFqlVzzrZflXuAPc_MGmjB/s320/split-hood.jpg)
As you can imagine, a lot of consternation arose when I mentioned doing a section on split hoods and bonnets. Bre wanted to know how that makes your car go faster, and he's got a point, it does nothing for car performance; but it's a must have for a customized show car. While it may have nothing to do with car performance, it has everything to do with car customization and is ideal for our section on pimped out cars. It also goes to show that with a little imagination mundane looking car parts can be turned into something realy unique!
For those of you who might not know what we're talking about, a split hood is a hood consists of two halves and opens from the middle like French doors. While a conventional hood is hinged either at the back or the front of the hood, a split hood is hinged at the sides, allowing it to open from the middle to each side. It's the latest craze at the car shows but split hoods date back to the 1920's and 1930's when they were stock items on cars such as the 1929 Ford Model A sedan and the 1939 Plymouth P8 DeLuxe. Only those were more practice as they were hinged from the middle and opened from the sides. On this page we'll look at split hoods and fitting a split hood kit but be warned, this is a fairly simple job but requires a fair amount of skill and is intended for show cars and not street cars!
PLANNING
Planning is a crucial part of fitting a split hood. Begin by removing the sound deadening material on the underside of your hood so that you can see the support braces that give the hood its rigidity. The idea is to split the hood without losing rigidity so you may need to weld additional support braces, especially along the split, to regain rigidity.
When it comes to making the split, you've got quite a bit of choices. You can go for a straight cut down the middle, an off center diagonal cut, a curved cut, a zig zag cut, or any other imaginable shape. But the easiest yet still most impressive split hoods are the off center diagonal cut and the 'S' shaped curve cut.
You also need to take into consideration the location of the hood release catch as you still need to close the hood. On anything other than a straight cut the hood release catch must be on the part of the hood that will be your leading edge as the leading edge will rest on the other part of the hood. On a straight cut or a cut that is in the middle of the hood release catch, you will need to replace or move the hood release catch.
SPLIT THE HOOD
Once you've planned your cut, mark it out on the hood with heavy duty masking tape. Then take an angle grinder or jig saw carefully cut through the outer sheet metal on the hood and the support braces below it. The angle grinder is best if you're going for a straight or curved cut, while the jig saw is better for making zig zag cuts and shapes with sharp bends.
Now you need to weld an overlapping seam on the underside of the half of the hood that is not the leading edge. The leading edge will rest on this overlapping seam and hold it down as the leading edge is the part that has the hood release catch. This part may be a little tricky as you need a fairly flat overlapping seam. Therefore you may need to remove some of the support braces near the edge so that the hood can close flush. You may also need to add a support brace along the seam to increase rigidity.
Once that's all done, you'll need to repaint the hood to protect the cut against corrosion and to give it a nice finish. You can also replace the sound deadening material once the hood has been repainted.
REFITTING
Now it's time to refit the hood. You'll need a split hood kit to refit the hood or you can fabricate your own hinges and opening mechanism. Some split hood kits come with articulated opening mechanisms and some come with remote openers, but fabricating your own kit is a viable option. All you need are hinges that will be fixed to the inside of the front wings (i.e., the front fenders) and the spring mechanism and counter balance pistons from a car trunk. The counter balance pistons will allow you to balance the split hood against the spring tension so that you have a smooth hood opening action.
When you fit the hinges remember that the hood must open without causing the hood to foul against the front wing. You also want to have a nice even gap on either side of the hood, as well as along the cut where the two halves meet.
Now when you pop the hood, the spring loaded hood release mechanism and the spring mechanism will allow the split hood to flip up smoothly.That's it then; another successful pimped out car customization from custom-car.us even if it is a bit more complicated than fitting a tilt hood kit, lambo doors and shaved door handles.
Yamaha Bison Modifications
Vario Scooter Concept Modification
![](http://1.bp.blogspot.com/_nt1knDXPQbQ/Szk7JWl4mOI/AAAAAAAACL8/TAQkot9Uu9w/s800/Vario+Scooter+Concept+Modification.jpg)
If you see every side of a pointed shape, symbolizing the hero weapons. As the front cover, original lamp. The most sensational part, of the back. The model is like a spiral. "I most like the stern of this and be able to invite the attention of people. Something really different," proud father of this child.
Honda Blade Concept Modification From CBR600
![](http://4.bp.blogspot.com/_nt1knDXPQbQ/Szk6h_YZRLI/AAAAAAAACL0/Y_caBnm3RKw/s800/Honda+Blade+Concept+Modification+From+CBR600.jpg)
Closing the 2009, Adhi Wicaksono handed Danukusuma modification works as a sort of breakthrough. Selected base modifiers of Lent Automodified Probolinggo, East Java, this is a Honda Blade 2009. "This must be a phenomenal work, so I'm support gone," said Budiono, the owner of the motor dealer who is also skipper Honda in Probolinggo Pigeons 2.Because Honda Blade, Adhi chose the concept refers to the modification Honda CBR600. Thus, a sports genre that is characteristic thick moved to Blade CBR600.
New BMW Vision Modification 2010
![new bmw vision unviled 2010](https://blogger.googleusercontent.com/img/b/R29vZ2xl/AVvXsEhqIatBvbpmcXt641_kWz0U7K9KjBc0TYy4wSHkgxlIYNoTfDII04qZvcClR9biDgbRStVG32zKk9jtuRsvQ_CpN0l0tg43D4W1xVegIIZP5aDAU5zB6RLAkNH2xkS0RC6BTMAtVgiwL3Q/s400/bmw-vision-ed-unveiled+2010.jpg)
Offering hybrid technology, the BMW Vision EfficientDynamics is powered by a three-cylinder turbodiesel and two electric motors. System output is 262kW (356hp), maximum torque is 800 Newton-metres (590 lb-ft). The all-wheel drive features an electric motor on both the front and rear axle.
![new bmw vision 2010](https://blogger.googleusercontent.com/img/b/R29vZ2xl/AVvXsEgScbfHFJkNLKpYcT1j1n6hFzNKqsLQz8qYQ8cLrjAI2FuHU3RaVXuTu3PbJ3Sqyy589zL7M-SAv9hKRDBagbqOGELJWNF168rjjiQTq687WZ5nEuEU9sKDFYMR7sZ3RiW8Q5kRYcC-VZ4/s400/new+BMW+vision.jpg)
![bmw vision modification interior](https://blogger.googleusercontent.com/img/b/R29vZ2xl/AVvXsEgEyVZJna1xWlz-KK57TH2v76FHcEWO2CBuq1TDQfD4BeYYCHTXP8hUrgRw444BviOa0pvrOFEFRC9GEpGEqkOTEc6UjpP6F8s7rLN9JrSLPV90X9yErMySxn8DXk2t5yDGvdOAoRcaVRA/s400/BMW+vision+modification+interior.jpg)
![modification of bmw vision](https://blogger.googleusercontent.com/img/b/R29vZ2xl/AVvXsEhQQoXGpNoqffxgGapfYs05N2f4xF_4KC9yAstprMo8-gNJ2wxc3gkbx84TvRHfCBHMvwH-2iMqnEauqVkoNxfNutk3F6ijMnNnbRI7sE5H3GzqTaqKebDBwGIz8AXdkV0AgzykbNtlFag/s400/bmw+vision+modify+2010.jpg)
![bmw vision modif 2010](https://blogger.googleusercontent.com/img/b/R29vZ2xl/AVvXsEhGYoHjsKk6H9l9jMF0oWe7Dy12ceIoFTXFxNdLJqr3Js3afPkbZq6E7GItGWT11alIf-WBlEDvc3yso3xrGUfPivI8ZoWnnKgCEuWF6EJSOA3VlXN7HVWOBk0Q2s3eDSY0pNpoObJElEs/s400/BMW+vision+modification+2010.jpg)
New Mégane Coupé Cabriolet with Elegant Interior Design
![New Renault Megane 2010 review](https://blogger.googleusercontent.com/img/b/R29vZ2xl/AVvXsEhLDUNwP-wT3uDywcqN13QtMQw24GYJO4TEbVQcx3Jne02ZWpGXqM2nRCB-wqahQX8CivxXNYs02PvFgE6dKOPWS2OGbG7sKqhf6W0jVmuEj5CtdBn57tEg3yVHCejLHF8KJwAmWiZyW9I/s400/New+Renault+Megane+2010-+%284%29.jpg)
With it’s new style, New Mégane Coupé-Cabriolet goes further by offering customers with unruffled open-top motoring supported by the forward position of the windscreen and a fixed glass, outstanding handling performance with a stiffer chassis and a new electric power steering system, and a broad choice of efficient and eco-friendly powertrains including the all-new automatic EDC (Efficient Dual Clutch) transmission.
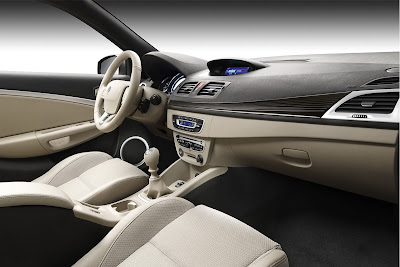
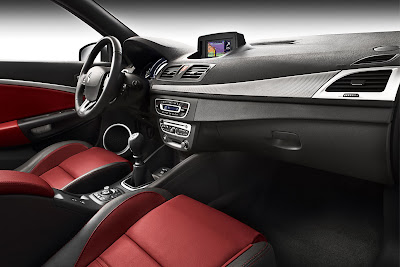
![New Renault Megane 2010 concept](https://blogger.googleusercontent.com/img/b/R29vZ2xl/AVvXsEg6djwVRBXvvZP6os_EOMAFg5_7FNzs0vvv5cZVz1vV2XRr3fkukbLKd5MxNjqCxX9K6NAFGugQd5bjgHIq0T0_1VkigXwhfMT6_GDSrxYkK7AB6nc88TxtD0DSEsroDLWDKt-kBSd4t4g/s400/New+Renault+Megane+2010-interior-+%284%29.jpg)
![New Renault Megane 2010 is the best car](https://blogger.googleusercontent.com/img/b/R29vZ2xl/AVvXsEh3f13IkZswdYLlJgLd-58m88AgRJlOVQfPQyOWavGF-lqFA2QBf9K29bneJajUZxR9VlCY7iDpZQtrxNlcErjciCj40SRWlmBPdyM-mZ4D3o40KTdv-YkKfjLkNQSqxWfRqYfO9ykfJao/s400/New+Renault+Megane+2010-+%283%29.jpg)
![New Renault Megane 2010 modification](https://blogger.googleusercontent.com/img/b/R29vZ2xl/AVvXsEgntwCL0dYMprzY9ZguqtlcqKWfAtMCUwvBDVAa8LWICUs2ktu5_XCrwTCGF8t6uCwQrSqdY9nuDWVNardsT81KwhfnNmvEECKpxJOTXVLVfXeEqTQ7BV2HjvfWh427nJg2D-McgffXMo8/s400/New+Renault+Megane+2010-+%282%29.jpg)
![New Renault Megane 2010 concept modify](https://blogger.googleusercontent.com/img/b/R29vZ2xl/AVvXsEgtLygOhwtr-NeswRIEPo-TUDeRYhIYgzBrRjRXsFJKyALelVCLbj41OB8FasVb_0JY_KHVZFdtNRixlFjvqlUEbc_jOrJfo262EjaOtbImuaoiXLPihGWt1DWFoG7Wfo3nMgkzx_W4T40/s400/New+Renault+Megane+2010-.jpg)
![New Renault Megane 2010 images](https://blogger.googleusercontent.com/img/b/R29vZ2xl/AVvXsEjvpQ8yuY0wFE1VERHU31AdrUIaj70IQ6-H8Fc69RFRqLXtYF50J4k358E7Lz3VHPraglwzWYQSVLLlbsTS-rt17rG9qWL1ATFQ9Whb0OTK46sih4F8EVJTmj3boElL4qkY42DdBeTaoiU/s400/New+Renault+Megane+2010-+%285%29.jpg)
The French carmaker claims the Megane CC's transparent glazed area of 0.47 sq. metres is the largest in the segment that includes cars like the Pininfarina-styled Ford Focus CC and the Peugeot 308 CC.
![New Renault Megane 2010 white](https://blogger.googleusercontent.com/img/b/R29vZ2xl/AVvXsEjYvxGeDHJj1HqvYOiWhkLpj1rmisZPGZqvDQjoJPOgEMkSfe-mgYl5yNUwdHSzZZ6iurhQ1kt1e8J1n5e6XrHfdtu_7oTyjSdlO93W8mjIqH-mp42_9wUpLuCiYRv4AANfKt8UGP5nOvc/s400/New+Renault+Megane+2010-interior-+%285%29.jpg)
![New Renault Megane 2010 popular car](https://blogger.googleusercontent.com/img/b/R29vZ2xl/AVvXsEh-E_fBPvZuzbBLAIgM1FEY_BhNlbw7hxuuMrEKV9pPyhKr1BLy90dbZqC20RSg9r4vCpMp1lo6iyhPnzF3ovAkjdbXYv6Kje2TIALvuC1gh76nJE3eNYUqMhzs5ZmSDcYN8WSMSuVbI7U/s400/New+Renault+Megane+2010-+%287%29.jpg)
![New Renault Megane 2010 great interior](https://blogger.googleusercontent.com/img/b/R29vZ2xl/AVvXsEhrFEjwhlApbTJlqVTp8z2nIDHeZDgv_CdZ_jmvjIGhIE03Kxfl4TkJWWX8bFSuU5FuDW3Jt_n0jsFqBN57U8BasbKFNfrTMX5unfBUeKlSVfOC72hUaGKDaUM0dH1L51cyLiURE1ZgUPQ/s400/New+Renault+Megane+2010-interior-.jpg)
Depending on the market, the new Megane Coupe-Cabriolet will be available with a choice of up to seven gasoline and diesel powertrains.
The petrol line includes a 110HP 1.6-liter unit linked to a six-speed manual, a 1.4-liter TCe turbo with 130HP matted to a six-speed manual and a 140HP 2.0-liter with a CVT.
![New Renault Megane 2010 interior best design](https://blogger.googleusercontent.com/img/b/R29vZ2xl/AVvXsEhXU5ytSrMVlJNbBTUdanSkq2v0OFV1oFe6z0XvmW7MQe-4hT6Q1y6dApgCS1icqiEwEM0zvFMnhloDXK6CGGyfTgWwgDxpjtLKpsXgVBVvor7_9D2u3ftBlPB7SOhzM71BKoDediD9Dxk/s400/New+Renault+Megane+2010-interior-+%281%29.jpg)
European sales of next generation Megane Coupe-Cabriolet will begin this spring.
![New Renault Megane 2010 interior design](https://blogger.googleusercontent.com/img/b/R29vZ2xl/AVvXsEgOc_7dlnR9o3iYCCW7ztpymtx8EbTb6kx-oehveX7TatUZOj42Zf1UeFEAkxxhiLNye4WgvzodjU1IuzZbiwOBmVhejGKZKEA19lW-4n56uO0ZvPDoYkXXEyEvw-xMpfsUxRx4RbQGGv8/s400/New+Renault+Megane+2010-interior-+%286%29.jpg)
![New Renault Megane 2010 desigh ellegant](https://blogger.googleusercontent.com/img/b/R29vZ2xl/AVvXsEjgAAxvIkFdVhTdgSpdccHO7cJC2wB93jh7Db83i7bUKzdwX-9llJio1rmOHTtTO79gtDRbKDSeebUZdcNo3Lv4cJwII6h8gjV1P52_qZzoHsapCHcw1O3-fyEbZWsG273SJ-g4VVGAHY0/s400/New+Renault+Megane+2010-interior-+%283%29.jpg)
![New Renault Megane 2010 good interior](https://blogger.googleusercontent.com/img/b/R29vZ2xl/AVvXsEgm9OsuRI6qe34vIPsaKI44W9_jFcgrTu1bsjlSZuRV1xTBq2dVisTVm6Lk1Vky7VaPPtlNDQwZCUHZuoRN8NtxN5IZHICYZcPc_oAp7xCyd2XT_fIC-hcRkYZIEeq9CgRz2HExZNi9acM/s400/New+Renault+Megane+2010-interior-+%282%29.jpg)
Subscribe to:
Posts (Atom)